Molten lava burgers.

It was only a matter of time before I posted a proper burger recipe and this is it.  Slow Food is important for a number of reasons, not least because you should end up with a tasty end product that knocks shop-bought items out of the park.  However, I’ve cooked plenty of things from scratch and wished I’d gone to the shops instead.  My burgers, for example, haven’t always been worth the time and effort I put in.   I’m happy to say that I’ve finally made a delicious burger that is going to revolutionise my summer eating!

Forget fast food joints and shiny posters of burgers that don’t represent what you’re actually sold.  Grab some quality ingredients and spend a few minutes making these meaty marvels.  Not only are they really easy to make, they’re very tasty and easy to adapt to your own tastes.  Life’s too short to eat grey patties between sugary bread.  Give dehydrated onions and wilting lettuce a miss.  Instead, go for fresh and fun molten lava burgers!  Hmmm…that sounds like it should be on a poster.

Molten lava burgers

375g minced beef

1 red chilli (finely chopped)

1 onion (finely chopped)

4 tblspoons fresh chives (finely chopped)

45g butter (melted)

2 tblspoons tomato ketchup

1 tspoon smoked paprika

1 tspoon Dijon mustard

half tspoon ground cumin

Cheddar cheese

salt and pepper

I made three large patties, but you could make smaller ones.

I began by putting all of the ingredients except the chilli and the cheese into a medium-sized bowl and mixing it up with a wooden spatula.  Season the mixture with plenty of salt and pepper.  I didn’t work the mixture too much because I didn’t want a tough texture for the burger.

I cut some thick slices of cheddar ready to go into the middle of the patties.  I then took some of the beef and made a large round patty.  I gently pressed the cheese onto the beef leaving a little room around the edges.  I sprinkled lots of the chopped chilli onto the cheese.  Next, I took some more beef and pressed it onto the patty making sure to completely cover the cheese.  I also checked that there were no holes for the cheese to ooze out of during cooking.

Now lots of recipes will recommend searing the burgers in a hot pan and then transferring to the oven to finish.  I didn’t do that, but I got wonderful results.  I fried the patties in butter on a low heat until nice and brown before turning them over.  I basted the patties with butter from the frying pan every now and again to keep them full of flavour.

The slow cooking meant that the meat cooked all the way through and just needed a few minutes in a hot oven at the end to bring it up to 71 degrees.

The biggest tip I can give you is to leave the patties alone while they cook.  Don’t prod them, don’t flip them, don’t lift them every minute for a peak at the underside.  Just let those bad boys cook.  Check them only occasionally to make sure that they aren’t burning.  If you keep bothering them, they’ll begin to crumble, you’ll have bits of burned onion in your pan and there will be smoke everywhere and cheese pouring out of the sides.  Let sleeping burgers lie.

Towards the end of frying, I tilted the pan to gather the butter in a little pool and slid the patties into it.  This helped cook the sides of the patties because they were quite thick.  You may not need to do this.  It just depends on the size of your patty.

I usually pile my burgers high with all kinds of silliness, but not this time.  The burgers were so tasty that I simply housed them in a toasted cheese-topped bap and served them with salad.  The chilli cheese was a real treat, but the flavour of the burger itself was the best thing.  You can’t beat slow food.

For the love of garlic.

Garlic frying in butter.  It announces that something special is taking place in the kitchen.  It draws you in, makes your imagination create wonderful possibilities, secret hopes of what the dish might be.  It’s the very beginning of something savoury and full of depth and irresistable flavour.  Garlic does all of this, and that’s before you even taste it.

When my French father-in-law visits, his suitcase is filled with all manner of food delights and this includes the ubiquitous garlic bulbs.  They’re three times the size of the puny bulbs available in English supermarkets and their flavour is wonderfully rounded and smooth.  If you want quality British garlic, you’ll have to look for it somewhere other than your local, friendly, giant, faceless, monopolizing supermarket.

With several bulbs of garlic from southern France, I felt charged with the responsibility of making something worthy of their quality.  My first thought was of garlic bread.  However, first ideas are not always the best and garlic bread is hardly an earth-shattering revelation.  Consulting colleagues didn’t yield any new ideas and I was beginning to scratch my head when suddenly, I had an earth-shattering revelation: garlic bread!

You may laugh (and possibly cease reading this altogether), but my first thought was not as silly as I’d judged it to be.  What better way to showcase the wonderful flavour of this garlic than to combine it with fairly bland, but satisfying ingredients?  I’ve enjoyed garlic soup in the Czech Republic and some wonderful chicken dishes with heaps of garlic in Thailand, but honestly, I wanted something with origins closer to home.

What follows is a recipe so full of garlic, that casual admirers of garlic may wish to turn the volume down on this one.  My recipe is for those who love garlic, I mean really love it.  Can you have too much of a good thing?  Probably.

Killer garlic bread

half French tiger stick (or plain baguette)

1 bunch fresh parsely (chopped)

10 garlic cloves (finely chopped)

150g salted butter

1 tblspoon olive oil

salt

It’s a killer garlic bread for a number of reasons.  Reading the ingredient list gives you a clue to at least one of them.  You can use more or less butter according to your taste (and lifestyle choices).  Copious amounts of butter, however, will guarantee a rich flavour and a moist end product.

After chopping all of the garlic finely, I heat the butter in a milk pan and fry the pungent cloves very gently.  If you burn any of the garlic, it is ruined.  The bitter taste of burned garlic is a real spoiler for any dish, so do take care to add enough butter to let the garlic float a little and give the pan a shake to make sure nothing sticks.  I often tilt the pan so that the butter gathers and cooks the garlic evenly.  I usually add a drop of olive oil to prevent the butter burning too.  Don’t add too much oil or you’ll end up with greasy garlic bread which is not pleasant.

The reason that I use a lot of butter is not just so that the garlic can be cooked evenly.  I need to mix the garlic butter with lots of parsley and spread it onto the bread.  Predictably, the bread soaks up the liquid, so there needs to be plenty of topping to cover the surface of the bread and also to soak into it.  We really want the flavour to seep through instead of sitting on the top.  I use a wooden spatula to mix in the parsley and then I season the buttery paste with some sea salt before spooning it onto the bread.

Tiger bread is very tasty, so when I spotted a French tiger stick, I was excited about using it to make the garlic bread.  You can use a regular baguette for the same result.  I only needed half and I cut through the length of the bread and opened it out to spread the verdant garlic butter onto the soft surface.  The parsley is essential for countering the strength of the garlic.  It also brings a fantastic colour to everything.  I left the bread for a few minutes to let the butter soak in.

I then lined a baking tin with foil and put the bread into a hot oven at 180C for about ten minutes or until the bread was crisp and golden.  Spreading the butter and parsley to the very edges of the bread ensured that nothing burned.  I ate mine with some cream cheese on the side which was a cool companion to every bold bite of this bread.  It’s delicious on its own and would go down a treat at a barbecue!  Just make sure you warn your friends that this garlic bread is the real deal.


Dear Dimitri, how dare you criticise British barbecuing prowess (or lack thereof)!

I love barbecue.  It’s a shame that I live in England, then.  The weather permits very little (successful) outdoor cooking and despite the best efforts of many a barbecue enthusiast, I’ve never enjoyed anything prepared outdoors in this country.  The fact is, we’re clueless when it comes to cooking meat anywhere other than the safety of the kitchen.

Tip-toe over the pond and it’s a whole different story.  Barbecue is an art and America has no shortage of towns and cities with a claim to being the home of the best barbecue in the land.  This doesn’t deter Brits from donning comedy aprons and dragging out the rusty grill at the first sign of sunshine.  No, sir!  Phonecalls are made, beer is bought and determined individuals set about preparing the area they’ll use to either cremate or under-cook a selection of poor quality meats.  Hours later and the reason why “we don’t do this very often” is clear to all.

Food companies are not deterred by inept British barbecuing either.  They thrive on it!  Sauces, marinades, sprays, sprinkles, seasoned crumbs, flavoured salt, posh pepper and a host of other flavour enhancers are widely available to mask the food-poisoning-between-bread that’s being served up.

You won’t find anything like that in my cupboard, though.  I make my rub from scratch.  Yes, sir!  Today I made a fantastic rub that is perfect for pork.  Of course, it was my good ol’ griddle that made the party go with a sizzle and not a rusty wire rack over some coals.  Still, the taste was superb and from now on, I don’t think I’ll be putting anything else on pork loin steaks!

Dimitri’s dry rub (for pork)

1 tblspoon light brown sugar

1 tblspoon coriander seeds

1 tblspoon smoked paprika

2 tspoons garlic salt

1 tspoon ground black pepper

1 tspoon ground cumin powder

half tspoon cayenne pepper

 This is a job for the pestle and mortar.  A coffee or spice grinder will probably do a good job too.  I began by toasting the coriander seeds in a dry pan until they just started to brown and release their wonderful flavour (which is nothing like the fragrant herb that they grow into).  I then ground all the ingredients to a fine powder and tipped the rub into a medium-sized bowl.

 I cut some pork loin steaks into cubes and tossed them in the powder before grilling on skewers.  I got equally good results with whole pork loin steaks cooked the same way:  A smoking hot griddle with a few minutes on each side to ensure succulence and a good char on the outside.

This rub is intended for meat that will be cooked immediately.  It’s not too sweet and not too spicy.  Perfect for summer!  Oh, and if you were wondering, no, my barbecuing prowess is sadly lacking.  I’ll keep to my griddle, thank you very much.

Joy on a plate.

You’ve just created something and it’s really good.  It’s so good that you want to jump and laugh and shout out, so you do.  Then you want to go and tell someone, show someone and point at what you’ve created and exclaim, “Look what I made!”  Joy is kindled.

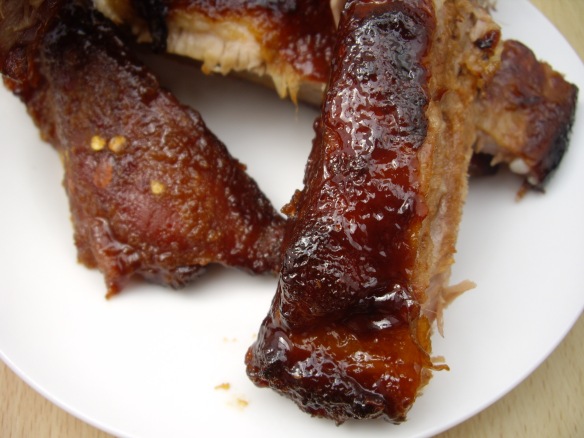
As an adult, there seem to be fewer and fewer of those moments.  Children seem to be constantly in the throes of creation and discovery is just around every ordinary corner.  Imagine the reaction I just wrote about happening in my kitchen about a year ago.  I’d just finished making barbecue ribs without the help of a book, a friend, or that white page with the little box for you to type in a question and click enter.  I’d just finished making barbecue ribs, I did it on my own, they were wondrous and they were mine.  Now I’m going to share the recipe for them.

My recipe for sweet and sticky barbecue ribs is tailor-made for domestic kitchens.  I know that you can get amazing results by cooking outside and getting so much smoke and flavour from blah blah blah.  Let’s get a cab and head for Real Street.  I live in a wet and windy part of the world with only glimpses of sunshine and a default setting of grey with a chance of greyer.  If you’re blessed enough to live in the sun and are adept at cooking outdoors, then…can I come and stay with you for a while?

The ribs require two hours of uninterrupted cooking, so plan ahead.  You’ll also have to trust me on a couple of things; namely the amount of sugar in the recipe.  I used all the things that I love for the ribs.  You could easily adapt the recipe for your own taste.

Sweet & sticky barbecue ribs

1 sheet of pork ribs

500g light brown sugar

40g garlic salt

1 tblspoon chilli flakes

half cup water

(For the glaze)

4 tblspoons clear honey

2 tblspoons dark soy sauce

3 tblspoons barbecue sauce

Preheat the oven to 160 degrees Celsius.  Place the ribs in a roasting tin ready for the rub.  Pour the garlic salt and the chilli flakes into a pestle and mortar and grind for a few minutes.  Rub this all over the ribs including the underside, making sure to be thorough.  Next, tip all of the sugar onto the top of the ribs and pat it down so that you have a thick layer of sugar on top with no meat uncovered.  I’m serious, trust me!

Pour the water into the bottom of the roasting tin (not over the ribs).  The water is going to help steam the meat during cooking.  This will keep it moist and soft.  Cover the roasting tin with two layers (or more) of foil and make a tight seal around the outside.  We don’t want any of that wonderful steam to escape.

Cook in the centre of the oven for two hours.  Don’t be tempted to take a peek lest all that steam disappear.

This slideshow requires JavaScript.

About five minutes before the ribs are due out of the oven, mix all the glaze ingredients together with a pastry brush in a little pot or ramekin.  Take the ribs out of the oven and carefully remove the foil.  Fire up your grill (or broiler if you’re from over the pond) ready for the final part.  The ribs will now be cooked through, but looking rather pale and sad.  Time to glaze!

Place the ribs on another tray lined with foil.  Brush the ribs with the glaze and put them under the grill on a medium heat.  As the glaze sets, remove the ribs and brush them with more glaze.  Continue to do this until you run out of glaze.  The idea is to build up sticky layers.  It won’t be long before the sugar in the glaze caramelizes and begins to burn at the edges giving you lovely crispy bits and oodles of flavour.  Did I just say oodles?  Hmmm…I’ve not seen that in type before.  Anyway, don’t panic if edges begin to burn.  A little here and there is perfect.  Just keep a close eye on the ribs because sugar burns quickly.

That’s it!  Done!  Now you just need to cut them up for your friends and soak up the silence as everyone tucks in.  There’s nothing like the slience that settles upon a table of happy eaters.  It’s up there with “Look what I made!”

Thank you for the days.

Alas, the pulled pork in my fridge is now gone.  Every last delicious strand.  It was with some sadness that I put the last of it inside some mini tortillas for lunch.  I spread cream cheese with garlic and herbs on the tortilla, piled the pulled pork high and topped it off with plenty of tomato salsa.

If you’ve read previous posts, you’ll know that I’m just a little enamoured of fresh coriander.  Just a little!  I had to finish the tortillas off with a sprinkling of it.  As soon as I’d taken the photograph, I proceeded to hide the pork under a green mountain of the stuff to the point that it looked like a salad.  Some readers have asked for an alternative to coriander recently.  For simple recipes like this, freshly chopped oregano works well, but obviously it brings a different flavour to the dish.

I’ll be cooking some more meat in the next week or so, starting with my ultimate recipe for perfect barbecue ribs.  Until then, I’ll have fond memories of the pulled pork and the joy it has brought to my plate each day.  Pulled pork, we (me and my stomach) salute you.

Barbecue brunch bliss.

I don’t eat breakfast.  It’s not the choice of breakfast options that puts me off.  I like cereal and I like toast and I like most breakfast choices (though I did once turn my nose up at tuna salad in Kyoto- that’s not breakfast food!)  When I wake up, I just don’t feel like eating.  An hour is about the length of time needed for my body to realise that I’m no longer sleeping.  If I wake up close to lunch time, however, then you can pretty much forget everything I just said.  If lunch were a place, it would be my permanent residence.

Which brings us to brunch.  Brunch means different things to different people.  To me?  It’s an excuse to have lunch early (and if I’m clever, I get to have lunch too!)  Having made a stack of pulled pork, I chose to start the day off well by making full use of it in all its tasty glory.

I’ll just have to accept that what I made is not going to be everyone’s idea of tasty, but believe me, I enjoyed it a lot.  I toasted some wholemeal bread, slapped mayo on the bottom slice, piled up lambs lettuce, went crazy with the amount of pulled pork on top of that and finished it all off with a fried egg and a squirt of barbecue sauce.  Now tell me if that ain’t a way to get the day going!

Like I said, I don’t eat breakfast; but if the pulled pork lasts, you may see me at the breakfast table every darn morning!

Any pork in a storm.

As I write to you now, sheets of heavy rain are being whipped, driven and lashed against every single exterior surface of our house.  Garden furniture is rolling in different directions and the dog is doing her best to look casual, when in fact, she’s clearly cowering underneath the dining table.  So much for summer.  Welcome, ladies and gentlemen, to the North West of England.

In sunnier climes, families and friends are discussing what is on the barbecue and whether or not there will be enough potato salad for everyone.  Sigh.  What I need is some sunshine.  Instead, the bellowing storm is deafening the dog and threatening to tear away the side of our home to reveal each room like a giant dolls’ house.  Armadillo eggs to the rescue!

Armadillo what?  You heard me right!  I was surfing the web (there has to be a better phrase) and came across a recipe for Armadillo eggs.  Delving further, I found an abundance of recipes each with their own take on what is a common appetizer at American barbecues in the South West.  They’re actually jalapenos stuffed with cheese and baked in an oven.  Some recipes call for bacon to be wrapped around the outside of the pepper, others instruct you to mix cheese and sausage meat and use it to stuff the jalapeno before baking.  With so many opinions on what makes an Armadillo egg, I decided to create my own version.  Yeehaw!  Ahem.  They turned out very well and brought some well-needed comfort to me and one rather frightened fluffy friend.

Armadillo eggs

375g sausage meat

165g sweet peppers

130g Cheddar cheese

100g cream cheese

1 green chili (finely chopped)

1 tspoon smoked paprika

I began by mixing together the cream cheese with half of the grated Cheddar.  I used a sharp Cheddar that would give the filling lots of flavour.  In another bowl, I put the sausage meat, chopped chili, smoked paprika and the rest of the grated Cheddar and  squeezed it all with my hands until I was satisfied that it was completely mixed.  This would be the coating for the Armadillo eggs.

I didn’t use jalapenos for this recipe.  Instead, I used a jar of Peppadew peppers.  They’re small and sweet and red and are just made for stuffing!  They are available with more heat and also stuffed with cream cheese, but I don’t like the idea of cream cheese that’s been sitting in vinegar for weeks.  I drained the sweet little beauties and began to take bits of the cream cheese and Cheddar mixture to fill each pepper.  This was quite easy because the Cheddar gives the cream cheese more body and it is easy to handle.

Once the peppers were full and all the cheese used, it was time for the tricky bit.  I thought that packing each pepper in sausage meat would be a doddle, but it took a little time and patience.  My first attempt was the size of a cricket ball.  After a few, they were looking more like meatballs, which is what I was aiming for.  I found that wetting my hands made it easier to handle the meat and stopped it sticking to my hands and breaking up.  My technique was to take some sausage meat, press it onto my palm, place a pepper on it cheese side down and then bring up the sides and mold it gently around.  Like I said, the first few weren’t great, but you kind of get a rhythm going by number five.  In the end, I made twenty Armadillo eggs.

I placed them gently onto a baking tray lined with baking paper.  I love using baking paper because foil often rips easily or sticks to meat.  Also, baking paper is an excellent barrier against grease and let’s face it, with sausage meat, there’s gonna be plenty of that around.

I cooked them in the oven, middle shelf at 170 degrees Celsius for thirty minutes.  They didn’t even need to be turned.  For once, I was patient and waited until they were slightly cooler before tucking in.  They certainly banished the stormy weather for a while.  I’ve kept some of my Armadillo eggs in the fridge- the weather forecast for tomorrow isn’t good.