Peas, perfect peas.

A few years ago, I wrote about the importance of making soup with love.  Today I’m going to make soup with peas.  The humble pea could easily be ignored by individuals keen to enjoy the meat from their roast dinner.  Children and adults might dislike the flavour of peas and find their colour or texture unappealing.  Not so in our household, where the pea has been given hero status due to its versatility and easy preparation.  My children have known from very early on in their lives that peas are our friends.  In pies; in stews; in fish suppers; in paella; in pilaf; in times of sorrow, peas will see you through.  If you thought that was hyperbole, you should hear me preach about carrots.

Earlier today, a casual conversation about soup (yes, we have so many casual soup conversations, don’t we?) sparked an immediate longing in me to make pea soup.  A colleague of mine, named Mrs. P for the purpose of this blog post, mentioned her love of pea and ham soup with dumplings.  Instantly, I pictured the open pack of bacon in my fridge (in a similar way that the internal cameras on the new Samsung smart fridge display the contents of each shelf- it’s going to be on my Christmas list for a while).  Pea and bacon soup was now on the horizon.


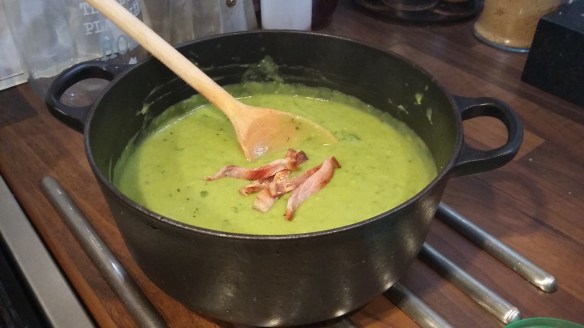
Fast forward to this evening and peas take centre stage in a comforting soup that couldn’t be easier to make.  Admittedly, I didn’t add dumplings this time because they went straight into a beef stew that had been cooking all day.  Next time, I’ll be ready.  For now, here’s my recipe for  pea and bacon soup (with photographs taken at night).  I could make more excuses about the image quality, but let’s face it, you didn’t come here for pretty pictures- you came here for peas.

Pea and bacon soup

500g frozen peas

4 rashers bacon

1 large potato (peeled and diced)

1 onion (sliced)

vegetable stock

1 tblspoon butter

small handful of flat leaf parsley

salt

pepper

I begin by frying the bacon in a little vegetable oil until crispy.  I then set it aside on kitchen paper and pat it dry before slicing it into strips.

To make the soup, gently fry the onion in butter and then add the diced potato before the onion browns.  Cook for a further minute or so and continue to stir.  Add all of the frozen peas and pour in the stock until the peas are just covered.

Bring to the boil and then simmer for about ten minutes until the potato is soft.  Add more stock if necessary.  Take the soup off the heat and add a small handful of torn flat parsley leaves. Use a hand blender to blitz the soup.  I usually leave a nice bit of texture to the soup, but you could make it completely smooth if you preferred.  Taste it and season it.  I tend to season it carefully because the bacon is salty enough together with the stock.

Stir in the bacon and add more stock to achieve the desired texture.  I love eating soup with crusty bread, but you could easily add dumplings or croutons to this.  You might even want to keep some strips of the fried bacon to garnish the soup.

Give it a go!  It’s a sure-fire way to bring peas and joy to your home.

20170207_215857.jpg

There was no food stylist available.

Cheddar and broccoli soup.

The thing about food blogging, is that you need to make things every week.  It’s fun!  It can also be frustrating when the food you make doesn’t turn out the way you wanted it to and there’s an empty screen waiting for a blog post.

In the last couple of weeks I’ve made a gorgeous almond and apricot stuffing for pork that tasted beautiful, but frankly, would kill my blog if I photographed it; a loaf of banana bread that tasted so good when toasted and smothered in Nutella that it was gone before I could get a shot of it; and then there was a baba ganoush that tasted okay, but was not really as delicious as baba ganoush can be.  Yes, writing a food blog can be frustrating.  I may just start reviewing movies instead.

To cheer myself up, I made a favourite soup of mine this weekend.  It’s not as naughty as you might expect from me, but you can double the cheese content if you like and even add a splash of double cream to make it more indulgent.  Either way, it’s a nice little soup to push you on until I post something more sugary.  Aah, it’s good to be back.  I missed ya!

Cheddar and broccoli soup.

1 broccoli stalk

100g mature Cheddar

Vegetable stock

 2 large potatoes

salt pepper

I cut off the brocoli florets and boiled them in water until tender.  I peeled and cubed the potatoes and boiled them until soft (just over ten minutes) in salted water and then drained them.

I placed the vegetables (and the water in which I’d cooked the broccoli) in a large pot and poured in enough vegetable stock to cover them.  I brought the stock to the boil and then took the pot of the heat.  Allowing the stock to cool made it safer to blend up the soup using a hand blender.  Once this was done, I grated the Cheddar into the soup and stirred it until completely melted.

Finally, I tasted the soup and seasoned it with plenty of sea salt and some black pepper.  It’s tastes delicious served with extra grated cheese and some crusty bread!

Tip:  Adding the broccoli water helps retain the nutrients lost through cooking.  Discard the water that you cooked the potatoes in because it often contains impurities and starch and doesn’t taste particularly nice.

Use your loaf (tin).

I trust your Christmas was filled with family, joy and inevitable chaos.  Mine too, hence the late post.  Despite the passing of the big day, I’m going to share the recipe for my very own pork and apricot terrine.  It’s perfect for a buffet and I make one (sometimes two) every Christmas.

You can easily adapt this recipe so that your own Christmas flavours are represented.

Pork & apricot terrine

500g sausage meat

14 slices streaky bacon

14 dried apricots

1 egg

2 tblspoons ground black pepper

1 tblspoon fresh thyme (chopped)

a pinch of ground allspice

a pinch of mace

a pinch of cinnamon

plenty of sea salt for seasoning to taste

olive oil

You have to admire the humble loaf tin.  So useful!  Line one with the bacon so that half of each slice is in the tin and the other half is draping over the sides.  The bacon keeps the terrine together as it cooks and will tighten up as water evaporates from it.

Grind plenty of black pepper into the lined tin.  Next, in a medium bowl, combine the remaining ingredients by mashing them together with the back of a fork.  A drop of olive oil into the mixture helps to keep it moist.  Tip half of the sausage mixture into the loaf tin and spread it evenly with the fork.  Gently press the apricots into the meat in pairs.  This will ensure that the apricots form part of each slice as you cut the terrine.

Top the apricots with the remaining sausage meat and once again, use the fork to even out the surface.  Now all you have to do is lift each bacon slice to cover the terrine and overlap them to form a parcel.  You can store the terrine as it is in the fridge until you are ready to cook it, or you can cook it immediately.

Place the terrine in a roasting tin and pour enough hot water into the surrounding tin to reach almost the top of the terrine.  Cover the loaf tin with foil and keep the edges sealed tightly.  Place in the middle of the oven at 180C for an hour.  The water surrounding the loaf tin will ensure even cooking and the foil will trap steam to help cook the meat without drying it out.

After an hour, remove the foil and continue to cook the terrine until the bacon on top is nicely done to your liking.  Using oven gloves, lift the loaf tin out of the water and drain of the excess fat rendered through cooking.  You may want to keep this fat and roast some potatoes in it later!  The meat will have shrunk away from the edges of the tin; this is normal.  Use a pair of tongs to turn the meat over.  Keep the meat in the little loaf tin and return it to the oven to brown and crisp up.

Once done, remove the meat and let it cool for quite some time.  When it is cooled, it will be firm and easy to slice.  Serve the terrine cold with a nice Christmas chutney.  You don’t have any Christmas chutney?  No problem.  Watch this space!


Soup to start…

Coco doesn't mind the cold weather.

Brrrrr!  It hasn’t been too warm recently, but that only serves to fuel my efforts in the kitchen in a bid to warm our bones and lift our spirits.  My love of soup is no secret, but with the festive season in full and jolly motion, I couldn’t possibly post a meagre soup recipe and wish you all the best.  So, I’ll begin with soup and then move onto some more substantial treats like my tasty terrine and some festive rocky road bars!  Yay!

I’m sure that if you’re a fan of soup, you’ll have your own winter favourite that springs to mind when thinking of a dark and icy evening.  My perfect winter warmer is French onion soup, but it hasn’t always been that way.

The very first time I tried French onion soup was not in France.  Sadly, no charming tale will follow of soup made by a gentleman in a small French village as the snow gently buried our broken-down car.  Instead, a chilly evening in Hong Kong (if such a thing existed), as I gingerly pushed open the door to Jimmy’s Kitchen.  The restaurant was dimly lit and the dark wood and old photographs added to the atmosphere.  I ordered the onion soup and delighted in the deep, warming flavours.  I’ve never looked back.  Winter night?  Onion soup.

Serving the soup is fun if you add a chunk of French bread and melt cheese over everything.  This time, I resisted.  The following recipe is simple and guaranteed to banish the winter chills.

French onion soup

3 red onions (sliced)

3 white/brown onions (sliced)

1 pint beef stock

1 glass red wine

butter

sea salt

pepper

Begin by gently frying the onions in a little butter on the lowest heat.  The onions should cook very gently and caramelize.  This takes a while and when done, the onions will be brown, but not burned.  If the onions begin to burn, turn the heat down and add tiny amounts of water or stock.

Next, transfer the onions to the pot that you intend to cook the soup in (if they aren’t in it already).  Pour in the stock and the wine and boil rapidly for a minute or two.  Reduce the heat and simmer gently for at least fifteen minutes (and up to thirty).  Season the soup to taste.  I sometimes add sprigs of thyme at this stage for a final flavour.  I told you it was simple!  As long as you cook the onions for long enough, you’ll have a dark soup with bags of flavour.  You can easily make it with fewer onions too.  I like a lot.  God bless the onion!

Tomorrow, festive rocky road bars (with pics, I promise)!

Don’t shoot the chef!

Today I had one of those moments when everything was perfect and I didn’t want time to move forward.  Curse you Father Time!  Have you ever been eating something that was so good that you stopped eating for a moment to take it all in?  The taste, the texture, the aroma?  Everything being just the way you want it and sadly coming closer to ending with every bite?  What else can you do, but continue eating and be thankful for the pleasure?  Boy, oh boy, was I a silent and contented eater.  I felt like Johnny Depp in that film where he eats the best puerco pibil he’s ever tasted and shoots the chef when he’s finished because “it’s just too good.”  Relax, no food bloggers were harmed in the making of this dish.  Ah, the dish…

A few years ago, I happened to catch a bit of a Gary Rhodes programme that was showing seasonal recipes.  If you’ve ever watched Gary Rhodes cook, you’ll know that he’s a perfectly nice chap with reliable recipes.  He also tends to be quite linear in his approach to food.  Let’s just say that Gary probably considers wearing odd socks to be a rebellious act.  Despite this, I was captivated by his recipe that day.  I immediately took to the kitchen to prepare my own take on what I considered to be a very promising little dish.

Me and N were hooked after that.  I made the dish regularly and tried different ingredients for fun and variety.  It’s been almost three years since I made it, but this week, I bought some duck eggs and my thoughts turned to the recipe I’d fallen in love with three winters ago.  It was time to make ducky egg pots.

Ducky egg pots (adapted from Gary Rhodes)

4 fresh duck eggs

200ml double cream

1 leek (sliced)

100g Cheddar cheese

4 slices prosciutto di Parma

butter

sea salt

black pepper

First of all, you need some ramekins.  This recipe will comfortably make four servings, so you need four ramekins.  Preheat the oven to 200 degrees Celsius and have your ramekins ready to fill.

Fry the sliced leek in butter on a medium heat until softened, but not browned.  Season the leeks to taste.  Set aside to cool slightly.  Next, pour just enough of the cream into each ramekin to cover the bottom.  Tear up the ham into little pieces and divide between each ramekin (one slice of ham per portion).  Divide the leek between the pots after that.

Press plenty of grated cheese on top of the leeks leaving at least a centimetre at the top of the ramekin for the egg to be poured in.  I like to grind some black pepper onto the cheese before cracking the egg onto it.  If you press the centre of the cheese down to make a little dent, the yolk will sit nicely in the middle.  (It’s doesn’t affect the cooking, but it’s pleasing to the eye).

So, without further ado, crack your duck egg into the centre.  Finally, pour some cream over each egg until it reaches the edge of the ramekin.  The cream forms a barrier over the egg to stop it cooking too quickly.

Place on a foil-covered baking tray and slide into the centre of the oven for about fifteen minutes.  My fan oven cooks the egg pots quite quickly, so I check on them every few minutes.  The top should be bubbling away and the yolk and white cooked through.  Test one if you’re unsure, by gently digging a teaspoon into the white.  Don’t worry of some of the cream bubbles over the top.

It’s okay to let the egg pots cool for a couple of minutes before serving.  The content will be gooey and hot.  The delight that you’ll get from digging through the creamy layers and letting the yolk and cheese ooze onto the leeks is immense.  The salty ham seasons the cream in the bottom of the pot and in return, the cream stops the ham drying out.  Everything becomes one indulgent dairy dance.

Yes you can dunk bread into them.  Yes you can be playful and make buttered soldiers for them.  Goodness, you could even mix it up with Chorizo in the bottom instead of ham and parmesan or your favourite cheese instead of Cheddar.  Truth is, this is my favourite incarnation of the dish.  I prefer it with duck eggs because of the rich flavour that you get from them, but eggs from hens work well too.

It’s taken a lot for me to share this recipe with you.  I have to admit that I thought about holding out on you, but I just couldn’t, dear reader.  These little ducky egg pots are just too good.  All I ask is that if you decide to try them, and you too have that perfect moment, you won’t come looking for me!