Sinfully simple snacks.

It was with some surprise that I finished reading The Picture of Dorian Gray and looked around for something to do.  The story ends rather abruptly, so I wasn’t expecting to be staring at the clock and wondering when my family would be back to break the silence.  The back of my edition is full of notes and reviews from Oscar Wilde’s contemporaries which makes the book look longer than it actually is, hence my surprise at the sudden end to this tale of youthful vanity and sin.  What I needed now was a snack that was quick to make.

Dorian Gray is a young man who wishes that all of his vices are passed onto a portrait of himself rather than his handsome face.  Over time, each of his sinful acts mar the portrait and age it beyond recognition while Dorian himself remains beautiful for all to see and envy.

In the same situation, I think my portrait would be a bloated chap with a chocolate milk moustache, cake crumbs on his chest and buttery fingers clasping a cheese and ham toastie.  It would be a truly grotesque display of gluttony that I’d hide away in the attic lest anyone should see my greedy soul laid bare on the canvas.

Back in my 21st Century kitchen, I was already throwing ingredients onto the worktop and keeping an eye on the clock.  There was just enough time to get some Cheddar and Parmesan biscuits into the oven and tidy up before my little boy burst into the room and cooking became a real challenge.

These little, cheesy biscuits are so easy to make and would work with different cheese and even a selection of herbs.  Try them when you feel like baking, but don’t want anything complicated or messy.  They’re small too, so you don’t need to worry about your portrait becoming hideous after you’ve eaten a few!

Cheddar & Parmesan biscuits

100g plain flour

85g mature Cheddar (finely grated)

50g butter

40g Parmesan cheese (finely grated)

2 egg yolks

2 tblspoons double cream

1 tspoon dried oregano

sea salt

1 egg yolk (beaten for the glaze)

In a medium bowl, stir together the butter, flour, two egg yolks, oregano and all of the cheese.  Season with a few good pinches of sea salt.  The mixture should come to a stiff dough.  Add the double cream and work the mixture gently with your hands.

Wrap the ball in clingfilm and refrigerate it for half an hour.  Roll out the dough on a lightly floured surface until it is about half a centimetre thick.  Use a small cutter to make little discs and place them on a tray lined with baking paper.  Add some beaten egg yolk to the top of each disc using a pastry brush.  This will give the biscuits a lovely glaze.

They need to go into the middle of a pre heated oven at 180C for about fifteen minutes.  Keep checking them.  They’re ready when slightly risen and a beautiful, shiny, golden colour.


Cheddar and broccoli soup.

The thing about food blogging, is that you need to make things every week.  It’s fun!  It can also be frustrating when the food you make doesn’t turn out the way you wanted it to and there’s an empty screen waiting for a blog post.

In the last couple of weeks I’ve made a gorgeous almond and apricot stuffing for pork that tasted beautiful, but frankly, would kill my blog if I photographed it; a loaf of banana bread that tasted so good when toasted and smothered in Nutella that it was gone before I could get a shot of it; and then there was a baba ganoush that tasted okay, but was not really as delicious as baba ganoush can be.  Yes, writing a food blog can be frustrating.  I may just start reviewing movies instead.

To cheer myself up, I made a favourite soup of mine this weekend.  It’s not as naughty as you might expect from me, but you can double the cheese content if you like and even add a splash of double cream to make it more indulgent.  Either way, it’s a nice little soup to push you on until I post something more sugary.  Aah, it’s good to be back.  I missed ya!

Cheddar and broccoli soup.

1 broccoli stalk

100g mature Cheddar

Vegetable stock

 2 large potatoes

salt pepper

I cut off the brocoli florets and boiled them in water until tender.  I peeled and cubed the potatoes and boiled them until soft (just over ten minutes) in salted water and then drained them.

I placed the vegetables (and the water in which I’d cooked the broccoli) in a large pot and poured in enough vegetable stock to cover them.  I brought the stock to the boil and then took the pot of the heat.  Allowing the stock to cool made it safer to blend up the soup using a hand blender.  Once this was done, I grated the Cheddar into the soup and stirred it until completely melted.

Finally, I tasted the soup and seasoned it with plenty of sea salt and some black pepper.  It’s tastes delicious served with extra grated cheese and some crusty bread!

Tip:  Adding the broccoli water helps retain the nutrients lost through cooking.  Discard the water that you cooked the potatoes in because it often contains impurities and starch and doesn’t taste particularly nice.

Ena, dio, tria…mini pasties!

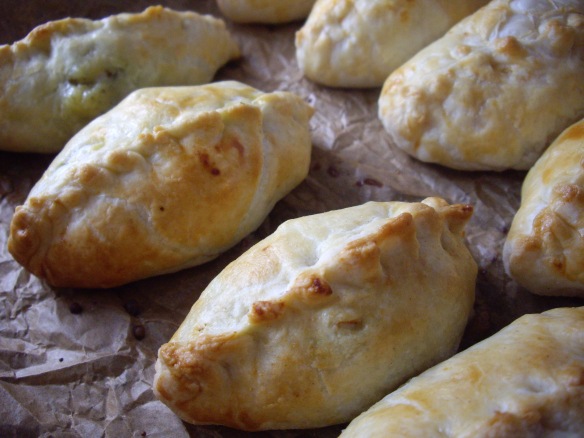
The most famous of all pasties are those made in Cornwall.  This little trio of pasties is a far cry from the giant Cornish beauties, but they are delicious!

I was ill last weekend and felt so rough, that I didn’t even cook.  It’s left me feeling eager to cook and write this week.  To begin with, I needed to use up some puff pastry in my freezer to make a little room.  I had such a great time making pasties last year that I thought it would be a good starting point for something new.

One of my favourite ingredients is Chorizo, so I thought that a nice chicken and Chorizo pasty would be fun.  Some peppers, some onions and some potato for substance.  Having bought the chicken, I then started toying with the idea of another filling and soon I’d made my mind up to try making a pesto chicken pasty.

Before I knew it, I’d added a third idea; a cheese and onion pasty.  Cheese and onion pasties are popular in these parts and I thought it would be good to add a veggie option to the gang.

The idea is simple enough: choose some ingredients to make a filling for a little parcel that can be baked in the oven and then eaten hot or cold.

With my decision made, I spent time preparing each filling and began my mini pasty experiment.  I was excited to see which one would turn out best.  Deep down, I knew the cheese and onion would work, but what of the other two?  I’m happy to say that my productive afternoon ended with smiles and I’ve been feeling very satisfied since.  My favourite was definitely the chicken and Chorizo pasty, but see what you think.

Mini pasties- chicken & chorizo, pesto chicken, cheese & onion

500g puff pastry

1 egg (beaten)

For the chicken & Chorizo filling

2 potatoes (cubed)

125g Chorizo sausage (cubed)

1 cooked chicken breast (cubed)

1 onion (diced)

1 red pepper (diced)

handful of chopped fresh coriander

salt

For the pesto chicken filling

2 potatoes (cubed)

1 cooked chicken breast (cubed)

A dozen mushrooms (diced)

1 tblspoon pesto

3 tblspoons grated Grana Padano

1 tblspoon olive oil

salt

For the cheese & onion filling

2 potatoes (cubed)

1 onion (diced)

5 tblspoons grated Cheddar

2 tspoons Dijon mustard

To make the chicken and Chorizo filling, I boiled the cubed potatoes for ten minutes and then drained them and set them aside to cool.  In a frying pan, I heated a little oil and fried the onions, Chorizo and pepper until the onions had cooked through and the Chorizo had released a beautiful red oil.  I stirred in the potatoes and the chicken along with some salt before finally sprinkling in the coriander.  The first filling was done!

For the pesto chicken, it was even easier.  I boiled the potatoes and drained them.  Next I put the potatoes, chicken, pesto and cheese in a bowl and stirred thoroughly.  I fried the mushrooms and stirred them in.  A little salt to season and some pepper finished the job.

Finally, the cheese and onion filling was made by boiling the cubed potatoes and letting them cool before putting them into a bowl with the Dijon mustard and cheese.  I fried the onions and then added them to the bowl.  All that was left to do was mix it all together gently and season everything.

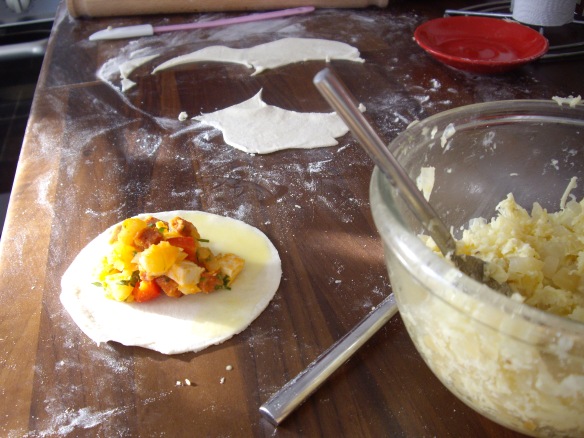
I rolled out the pastry until it was very thin and made use of a small saucer from an espresso cup to cut a circle.  A couple of tablespoons is all that is needed to fill the pasty and it’s important not to overfill it (tempting as it is).

Brushing the edge of half the pastry circle with egg wash helps to seal the pasty when you bring the edges together.  Just crimp the edges with a fork or fold and press them to stop the filling oozing out in the oven.  Place the pasties on a baking tray lined with baking paper and use a pastry brush to add the egg wash to each one.  This will give the pasties a lovely golden glaze.

Pop the little beauties in the oven for about twenty minutes at 180C or until they are golden.  You’ll know exactly when to take them out.

These make a great little snack and can be eaten cold.  If you make mini pasties as I did, you’ll be able to get about forty by making all three of the fillings.  Obviously, if you decide to make just one type of filling, you will definitely not need 500g of pastry!

I think I might make giant pasties next time and have them as part of a main meal.  I’m so happy with how these turned out.  Let me know if you decide to give them a go!

120g Chorizo sausage (cubed)

The many faces of filo.

“Aah, filo pastry.  We have been expecting you.”  I can’t help feeling guilty when I make something using filo pastry.  First of all, pastry isn’t exactly a superfood and folk who take care of their bodies won’t thank you for a big ol’ pie.  Secondly, filo pastry is so versatile and easy to use.  Yes, I said easy!  Don’t let the television scaremongerers put you off experimenting with it.  Filo does dry out quickly and is very delicate, but it is also easy to cut, fold, layer and shape.  The fact that you can produce savoury or sweet dishes with ease, adds to the appeal.

Previously, I’ve had fun making chocolate filo parcels and when it comes to Greek puddings, filo is never too far away (that reminds me, I need to post a recipe for a lovely Greek pudding).  Filo has always been my go-to pastry for sweet stuff, but over the weekend, I found myself with some spare fresh filo and a box of beautiful chestnut mushrooms.  They have a wonderful nutty flavour and I’ve stocked up on them so that I can make my favourite mushroom soup.  However, we needed lunch in a matter of minutes and I wanted something interesting.  Filo to the rescue.

Le Roule & mushroom filo parcels

(Recipe makes 2 parcels)

2 sheets filo pastry

250g chestnut mushrooms (sliced)

2 small handfuls fresh rocket leaves

2 tblspoons Le Roule cheese

25g melted butter

salt & pepper

Begin by preheating the oven to 200 degrees Celsius.

Lay the sheets of filo out and cut them in half to form two squares.  Brush the squares with melted butter and lay a second filo square on top of each.  These will be your parcels.

Meanwhile, fry the mushrooms in a little butter on a high heat until cooked through and beginning to brown at the edges.  Grind some black pepper over them, but  don’t add salt yet.  Salt draws out moisture from the mushrooms and makes them soggy.  Yuk!

Put a little pile of fresh rocket onto the filo square and top with half of the mushrooms.  Season with salt.  Add a tablespoon of Le Roule on the top and then brush the edges of the square with melted butter.  Now bring two opposite corners of the square together, placing one under the other and brushing them with a little more butter.  Do the same with the remaining corners to form a parcel.

Brush the whole parcel with melted butter and place on a lined baking tray in the centre of the oven for about fifteen minutes or until the parcel is golden and the pastry crispy.  Be careful, the contents will be very hot.

Feeling hungry, I went on to make another parcel using baby plum tomatoes and basil leaves.  I added grated Cheddar instead of Le Roule and sprinkled some dried oregano on for good measure.  The result was something like a little pizza parcel, so it goes without saying that I was enthralled.  Filo may not be forgiving, but it is rewarding.  Give it a go!

You ain’t from around here, are ya, boy?

In Texas, people have been shot for serving nachos incorrectly.  Okay, that’s not true.  Sorry.  Closer to the truth, is the fact that those in the know will not pile a plate high with tortilla chips and a mountain of melted cheese and call themselves a Texan.  A cursory glance around the world of online nacho appreciation will reveal that discerning nacho lovers prefer their chips to be dressed and served individually.

This came as something of a revelation to me.  Granted, I’m a Greek-born, British citizen, raised on a combination of shepherds pie and olives (though not together), so there’s no reason that I would have any expertise in the nacho department.  That sounded odd, but stick with me.  I have always been ignorant in my cheese-melting bliss and have spent hours chomping through plates full of cheese-coated tortilla chips.  To my credit, I always spread the chips in a thin layer so as to coat each one with cheese, but still, there wasn’t a great deal of care involved.

With enough pulled pork in my fridge to feed my extended family, I knew it was time to try something fun with it.  I’ve seen other bloggers dress their nachos with cheese and a jalapeno and I’ve seen some pulled pork with cheese and barbecue sauce too.  As usual, I stacked the nachos my way.

I chopped fresh coriander (cilantro) and sprinkled it onto each chip.  Next came the pulled pork followed by gorgeous Cheddar cheese and topped with a slice of jalapeno.  Straight into the oven until the cheese had melted and then straight into my belly!  They were very satisfying.  The sweet smokiness of the pork, the freshness of the coriander, the comfort of the cheese, and the crunch and spice of the jalapeno and the tortilla chip.  I have been converted.  It took a little bit of love and care, but it was so worth it.  Is it authentic?  I don’t know.  If you’re reading this and you’re from Texas, please don’t shoot me…

Any pork in a storm.

As I write to you now, sheets of heavy rain are being whipped, driven and lashed against every single exterior surface of our house.  Garden furniture is rolling in different directions and the dog is doing her best to look casual, when in fact, she’s clearly cowering underneath the dining table.  So much for summer.  Welcome, ladies and gentlemen, to the North West of England.

In sunnier climes, families and friends are discussing what is on the barbecue and whether or not there will be enough potato salad for everyone.  Sigh.  What I need is some sunshine.  Instead, the bellowing storm is deafening the dog and threatening to tear away the side of our home to reveal each room like a giant dolls’ house.  Armadillo eggs to the rescue!

Armadillo what?  You heard me right!  I was surfing the web (there has to be a better phrase) and came across a recipe for Armadillo eggs.  Delving further, I found an abundance of recipes each with their own take on what is a common appetizer at American barbecues in the South West.  They’re actually jalapenos stuffed with cheese and baked in an oven.  Some recipes call for bacon to be wrapped around the outside of the pepper, others instruct you to mix cheese and sausage meat and use it to stuff the jalapeno before baking.  With so many opinions on what makes an Armadillo egg, I decided to create my own version.  Yeehaw!  Ahem.  They turned out very well and brought some well-needed comfort to me and one rather frightened fluffy friend.

Armadillo eggs

375g sausage meat

165g sweet peppers

130g Cheddar cheese

100g cream cheese

1 green chili (finely chopped)

1 tspoon smoked paprika

I began by mixing together the cream cheese with half of the grated Cheddar.  I used a sharp Cheddar that would give the filling lots of flavour.  In another bowl, I put the sausage meat, chopped chili, smoked paprika and the rest of the grated Cheddar and  squeezed it all with my hands until I was satisfied that it was completely mixed.  This would be the coating for the Armadillo eggs.

I didn’t use jalapenos for this recipe.  Instead, I used a jar of Peppadew peppers.  They’re small and sweet and red and are just made for stuffing!  They are available with more heat and also stuffed with cream cheese, but I don’t like the idea of cream cheese that’s been sitting in vinegar for weeks.  I drained the sweet little beauties and began to take bits of the cream cheese and Cheddar mixture to fill each pepper.  This was quite easy because the Cheddar gives the cream cheese more body and it is easy to handle.

Once the peppers were full and all the cheese used, it was time for the tricky bit.  I thought that packing each pepper in sausage meat would be a doddle, but it took a little time and patience.  My first attempt was the size of a cricket ball.  After a few, they were looking more like meatballs, which is what I was aiming for.  I found that wetting my hands made it easier to handle the meat and stopped it sticking to my hands and breaking up.  My technique was to take some sausage meat, press it onto my palm, place a pepper on it cheese side down and then bring up the sides and mold it gently around.  Like I said, the first few weren’t great, but you kind of get a rhythm going by number five.  In the end, I made twenty Armadillo eggs.

I placed them gently onto a baking tray lined with baking paper.  I love using baking paper because foil often rips easily or sticks to meat.  Also, baking paper is an excellent barrier against grease and let’s face it, with sausage meat, there’s gonna be plenty of that around.

I cooked them in the oven, middle shelf at 170 degrees Celsius for thirty minutes.  They didn’t even need to be turned.  For once, I was patient and waited until they were slightly cooler before tucking in.  They certainly banished the stormy weather for a while.  I’ve kept some of my Armadillo eggs in the fridge- the weather forecast for tomorrow isn’t good.