Time to meet sweet meat.

20150405_130650

Easter rolled around and before I knew it, I’d invited my family over for dinner on Sunday.  I wanted to do something different and soon settled on gammon cooked in Coca Cola.  Yeah, when I say different, I mean it.  There are numerous recipes for meat cooked in fizzy pop, not least my pulled pork recipe which uses Cherry Coke.  The recipe for a Coca Cola gammon joint is very simple, inexpensive and guarantees tasty results every time.  Once cooked and glazed, this bad boy can go with any number of side dishes or take centre stage in an amazing sandwich.  It’s up to you!  I like serving it with chips, salad, coleslaw, potato salad and all kinds of chutney action.

Coca Cola Gammon Joint

2kg cured gammon joint (boneless)

2L Coca Cola

1 red pepper (quartered)

2 brown onions (quartered)

2 tspoons smoked paprika

2 tspoons chili flakes


For the glaze

3 or 4 tblspoons honey

1 tblspoon dark soy sauce

1 tblspoon Dijon mustard

Begin by placing the gammon in a large casserole and adding water until it is almost covered.  Bring the water to the boil and them simmer for several minutes, turning half way through.  Drain off all the water.  This makes the cured gammon more palatable, less salty.  Now your joint is ready to be cooked properly.  Cook the gammon for approximately an hour per kilo.

Pour in enough Coca Cola to just about cover the joint and bring to the boil.  Stir the onions, red pepper, paprika and chili flakes.  Lower the heat and continue to simmer for the next couple of hours.  Again, turn the joint over half way to ensure even cooking.  Top up the cola from time to time as it evaporates.

When the time is up, remove the joint and let it rest.  If you want toglaze the joint immediately, you can.  I left it to rest and went to bed…so that I could rest.  The next day, prior to serving, I quickly made the glaze.  Stir the honey, soy sauce and mustard together.  Spread it thickly over the top of the gammon, completely covering the fat.  Place the gammon on a roasting tin and into an oven at 180C for about 40-45 minutes.  This will heat the joint through and glaze the top.  Prevent the top from burning by moving the gammon to a lower shelf if necessary.

Allow the joint to cool slightly before carving.  Enjoy!20150405_130618

Dear Dimitri, how dare you criticise British barbecuing prowess (or lack thereof)!

I love barbecue.  It’s a shame that I live in England, then.  The weather permits very little (successful) outdoor cooking and despite the best efforts of many a barbecue enthusiast, I’ve never enjoyed anything prepared outdoors in this country.  The fact is, we’re clueless when it comes to cooking meat anywhere other than the safety of the kitchen.

Tip-toe over the pond and it’s a whole different story.  Barbecue is an art and America has no shortage of towns and cities with a claim to being the home of the best barbecue in the land.  This doesn’t deter Brits from donning comedy aprons and dragging out the rusty grill at the first sign of sunshine.  No, sir!  Phonecalls are made, beer is bought and determined individuals set about preparing the area they’ll use to either cremate or under-cook a selection of poor quality meats.  Hours later and the reason why “we don’t do this very often” is clear to all.

Food companies are not deterred by inept British barbecuing either.  They thrive on it!  Sauces, marinades, sprays, sprinkles, seasoned crumbs, flavoured salt, posh pepper and a host of other flavour enhancers are widely available to mask the food-poisoning-between-bread that’s being served up.

You won’t find anything like that in my cupboard, though.  I make my rub from scratch.  Yes, sir!  Today I made a fantastic rub that is perfect for pork.  Of course, it was my good ol’ griddle that made the party go with a sizzle and not a rusty wire rack over some coals.  Still, the taste was superb and from now on, I don’t think I’ll be putting anything else on pork loin steaks!

Dimitri’s dry rub (for pork)

1 tblspoon light brown sugar

1 tblspoon coriander seeds

1 tblspoon smoked paprika

2 tspoons garlic salt

1 tspoon ground black pepper

1 tspoon ground cumin powder

half tspoon cayenne pepper

 This is a job for the pestle and mortar.  A coffee or spice grinder will probably do a good job too.  I began by toasting the coriander seeds in a dry pan until they just started to brown and release their wonderful flavour (which is nothing like the fragrant herb that they grow into).  I then ground all the ingredients to a fine powder and tipped the rub into a medium-sized bowl.

 I cut some pork loin steaks into cubes and tossed them in the powder before grilling on skewers.  I got equally good results with whole pork loin steaks cooked the same way:  A smoking hot griddle with a few minutes on each side to ensure succulence and a good char on the outside.

This rub is intended for meat that will be cooked immediately.  It’s not too sweet and not too spicy.  Perfect for summer!  Oh, and if you were wondering, no, my barbecuing prowess is sadly lacking.  I’ll keep to my griddle, thank you very much.

There are many reasons why I will not entertain becoming a vegetarian. Steak and ale pie is one of them.

My concern for animals extends beyond owning and loving our over-sensitive collie/lab cross.  Like many who enjoy food, my consumer conscience pushes me to find out about the origins of what I eat and how well animals are treated before I will make a purchase.  The best way of doing this is to get to know your butcher, which may seem like an alien concept if you’ve spent the last decade putting sealed plastic trays of chopped meat into your trolley.

In truth, the household budget has more impact on our attitudes towards food than perhaps we’d like to admit.  In my student days, the last thing on my mind was the welfare of livestock in our county when looking for the main ingredient in the curry I’d promised to cook for my flatmates.  Was the meat I bought even from this county?  From this country?  Who knew?  One person who does know is your local butcher, which brings us back to the issue of shopping close to home and supporting independent businesses.  The supermarkets are winning.

However, well-sourced, good quality meat that you know has come from animals treated properly, is not the reserve of the affluent members of each community.  By simply speaking to your butcher and telling them what you are going to cook, you’ll find which are the most suitable cuts and what offers value for money.  Good cooking starts with good shopping.

Of course, many among you will shake your heads knowingly and state that vegetarianism offers a wonderful diet with fewer pitfalls in sourcing.  However, I know deep down that I will always eat meat and that even the most insightful arguments against it cannot compete with steak and ale pie.

Steak and ale pie

800g stewing steak (cut into chunks)

500g Robinson’s Unicorn ale

500g puff pastry

4 large carrots (sliced)

8 mushrooms (sliced thickly)

1 onion (sliced)

4 cloves garlic (sliced)

4 tspoons Dijon mustard

2 beef stock cubes

half tspoon cayenne pepper

butter

sea salt

black pepper

plain flour

1 egg

I made this recipe using Robinson’s Unicorn, but any quality ale will do.  You could even try it with good, old Guinness.  I’m sure it would work a treat.  I drank Unicorn beer on my stag do in the Lake District and it’s a cracking pint!  I washed this pie down with a bottle of Hobgoblin and I can recommend that too.

First of all, heat a nob of butter in a heavy pan and brown the beef.  I sprinkled in some plain flour to coat the beef as it was cooking and I ground lots of black pepper in too.  No salt at this stage.

When the beef was brown, I added the onions and garlic and put the lid on to help soften them.  This only took a couple of minutes and with some stirring, the onions were cooked through.  I threw in the carrots and poured in 250ml of beer before stirring in the mustard.  Make sure everything is well combined, add more black pepper (if you love it like I do) and the stock cubes and let it simmer for about fifteen minutes.

Meanwhile, in a small frying pan, fry the mushrooms in some butter and then add them to the beef.  Sprinkle in the cayenne pepper.  Pour in the rest of the beer.  Stir.

Pop a tight lid on the beef and put it into the oven at 170C for about two hours.  Stir it every now and again and season to taste with the sea salt.

To top the pie, roll out the pastry and tip your pie dish onto it.  Cut around the pie dish carefully leaving a few centimetres more than needed around the edges.  The pastry will shrink in the oven.  When the beef is cooked and the gravy is nice and thick, tip it all into the pie dish and cover with the pastry.  Beat the egg and use a brush to coat the pastry.  This will give your pie a nice glaze.

Put the pie into the oven for as long as it takes for the pastry to puff up and turn golden.  Serve it with vegetables and your favourite beer.  Next time, I think I’ll serve it with the same ale that went into making it…and some mashed potato.  Lots of buttery mashed potato.  Winter fare doesn’t get any better than that.

Use your loaf (tin).

I trust your Christmas was filled with family, joy and inevitable chaos.  Mine too, hence the late post.  Despite the passing of the big day, I’m going to share the recipe for my very own pork and apricot terrine.  It’s perfect for a buffet and I make one (sometimes two) every Christmas.

You can easily adapt this recipe so that your own Christmas flavours are represented.

Pork & apricot terrine

500g sausage meat

14 slices streaky bacon

14 dried apricots

1 egg

2 tblspoons ground black pepper

1 tblspoon fresh thyme (chopped)

a pinch of ground allspice

a pinch of mace

a pinch of cinnamon

plenty of sea salt for seasoning to taste

olive oil

You have to admire the humble loaf tin.  So useful!  Line one with the bacon so that half of each slice is in the tin and the other half is draping over the sides.  The bacon keeps the terrine together as it cooks and will tighten up as water evaporates from it.

Grind plenty of black pepper into the lined tin.  Next, in a medium bowl, combine the remaining ingredients by mashing them together with the back of a fork.  A drop of olive oil into the mixture helps to keep it moist.  Tip half of the sausage mixture into the loaf tin and spread it evenly with the fork.  Gently press the apricots into the meat in pairs.  This will ensure that the apricots form part of each slice as you cut the terrine.

Top the apricots with the remaining sausage meat and once again, use the fork to even out the surface.  Now all you have to do is lift each bacon slice to cover the terrine and overlap them to form a parcel.  You can store the terrine as it is in the fridge until you are ready to cook it, or you can cook it immediately.

Place the terrine in a roasting tin and pour enough hot water into the surrounding tin to reach almost the top of the terrine.  Cover the loaf tin with foil and keep the edges sealed tightly.  Place in the middle of the oven at 180C for an hour.  The water surrounding the loaf tin will ensure even cooking and the foil will trap steam to help cook the meat without drying it out.

After an hour, remove the foil and continue to cook the terrine until the bacon on top is nicely done to your liking.  Using oven gloves, lift the loaf tin out of the water and drain of the excess fat rendered through cooking.  You may want to keep this fat and roast some potatoes in it later!  The meat will have shrunk away from the edges of the tin; this is normal.  Use a pair of tongs to turn the meat over.  Keep the meat in the little loaf tin and return it to the oven to brown and crisp up.

Once done, remove the meat and let it cool for quite some time.  When it is cooled, it will be firm and easy to slice.  Serve the terrine cold with a nice Christmas chutney.  You don’t have any Christmas chutney?  No problem.  Watch this space!


Joy on a plate.

You’ve just created something and it’s really good.  It’s so good that you want to jump and laugh and shout out, so you do.  Then you want to go and tell someone, show someone and point at what you’ve created and exclaim, “Look what I made!”  Joy is kindled.

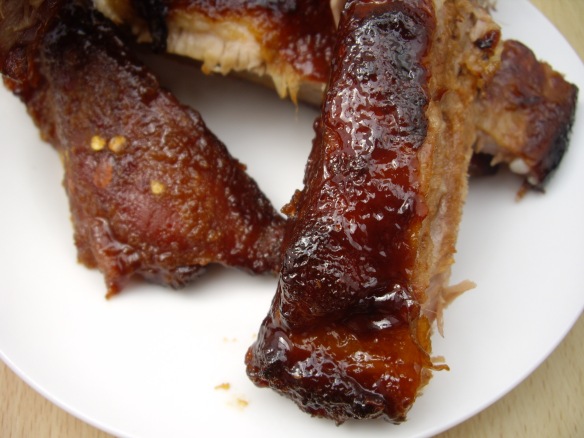
As an adult, there seem to be fewer and fewer of those moments.  Children seem to be constantly in the throes of creation and discovery is just around every ordinary corner.  Imagine the reaction I just wrote about happening in my kitchen about a year ago.  I’d just finished making barbecue ribs without the help of a book, a friend, or that white page with the little box for you to type in a question and click enter.  I’d just finished making barbecue ribs, I did it on my own, they were wondrous and they were mine.  Now I’m going to share the recipe for them.

My recipe for sweet and sticky barbecue ribs is tailor-made for domestic kitchens.  I know that you can get amazing results by cooking outside and getting so much smoke and flavour from blah blah blah.  Let’s get a cab and head for Real Street.  I live in a wet and windy part of the world with only glimpses of sunshine and a default setting of grey with a chance of greyer.  If you’re blessed enough to live in the sun and are adept at cooking outdoors, then…can I come and stay with you for a while?

The ribs require two hours of uninterrupted cooking, so plan ahead.  You’ll also have to trust me on a couple of things; namely the amount of sugar in the recipe.  I used all the things that I love for the ribs.  You could easily adapt the recipe for your own taste.

Sweet & sticky barbecue ribs

1 sheet of pork ribs

500g light brown sugar

40g garlic salt

1 tblspoon chilli flakes

half cup water

(For the glaze)

4 tblspoons clear honey

2 tblspoons dark soy sauce

3 tblspoons barbecue sauce

Preheat the oven to 160 degrees Celsius.  Place the ribs in a roasting tin ready for the rub.  Pour the garlic salt and the chilli flakes into a pestle and mortar and grind for a few minutes.  Rub this all over the ribs including the underside, making sure to be thorough.  Next, tip all of the sugar onto the top of the ribs and pat it down so that you have a thick layer of sugar on top with no meat uncovered.  I’m serious, trust me!

Pour the water into the bottom of the roasting tin (not over the ribs).  The water is going to help steam the meat during cooking.  This will keep it moist and soft.  Cover the roasting tin with two layers (or more) of foil and make a tight seal around the outside.  We don’t want any of that wonderful steam to escape.

Cook in the centre of the oven for two hours.  Don’t be tempted to take a peek lest all that steam disappear.

This slideshow requires JavaScript.

About five minutes before the ribs are due out of the oven, mix all the glaze ingredients together with a pastry brush in a little pot or ramekin.  Take the ribs out of the oven and carefully remove the foil.  Fire up your grill (or broiler if you’re from over the pond) ready for the final part.  The ribs will now be cooked through, but looking rather pale and sad.  Time to glaze!

Place the ribs on another tray lined with foil.  Brush the ribs with the glaze and put them under the grill on a medium heat.  As the glaze sets, remove the ribs and brush them with more glaze.  Continue to do this until you run out of glaze.  The idea is to build up sticky layers.  It won’t be long before the sugar in the glaze caramelizes and begins to burn at the edges giving you lovely crispy bits and oodles of flavour.  Did I just say oodles?  Hmmm…I’ve not seen that in type before.  Anyway, don’t panic if edges begin to burn.  A little here and there is perfect.  Just keep a close eye on the ribs because sugar burns quickly.

That’s it!  Done!  Now you just need to cut them up for your friends and soak up the silence as everyone tucks in.  There’s nothing like the slience that settles upon a table of happy eaters.  It’s up there with “Look what I made!”