Insert risotto pun here. 

I’m at a loss. Risotto does plenty for my appetite, but fails to inspire a decent title for this post.  In risotto’s defence, it is a superb dish for using up ingredients, and that’s good news towards the end of a week.

Is it a regular on our menu at home? Nope.  Risotto doesn’t lend itself to nightly meals with children around.  Like children, it requires close attention and this alone relegates the dish to weekend cooking.  Take your eye off the pan and the rice will begin to crisp and burn without more stock.  The resulting crust, which is sought after in a paella, ruins a risotto completely.

Slow, slowly.  Risotto is not something to be rushed.  Choose ingredients carefully and add them at the right time for a satisfying result.

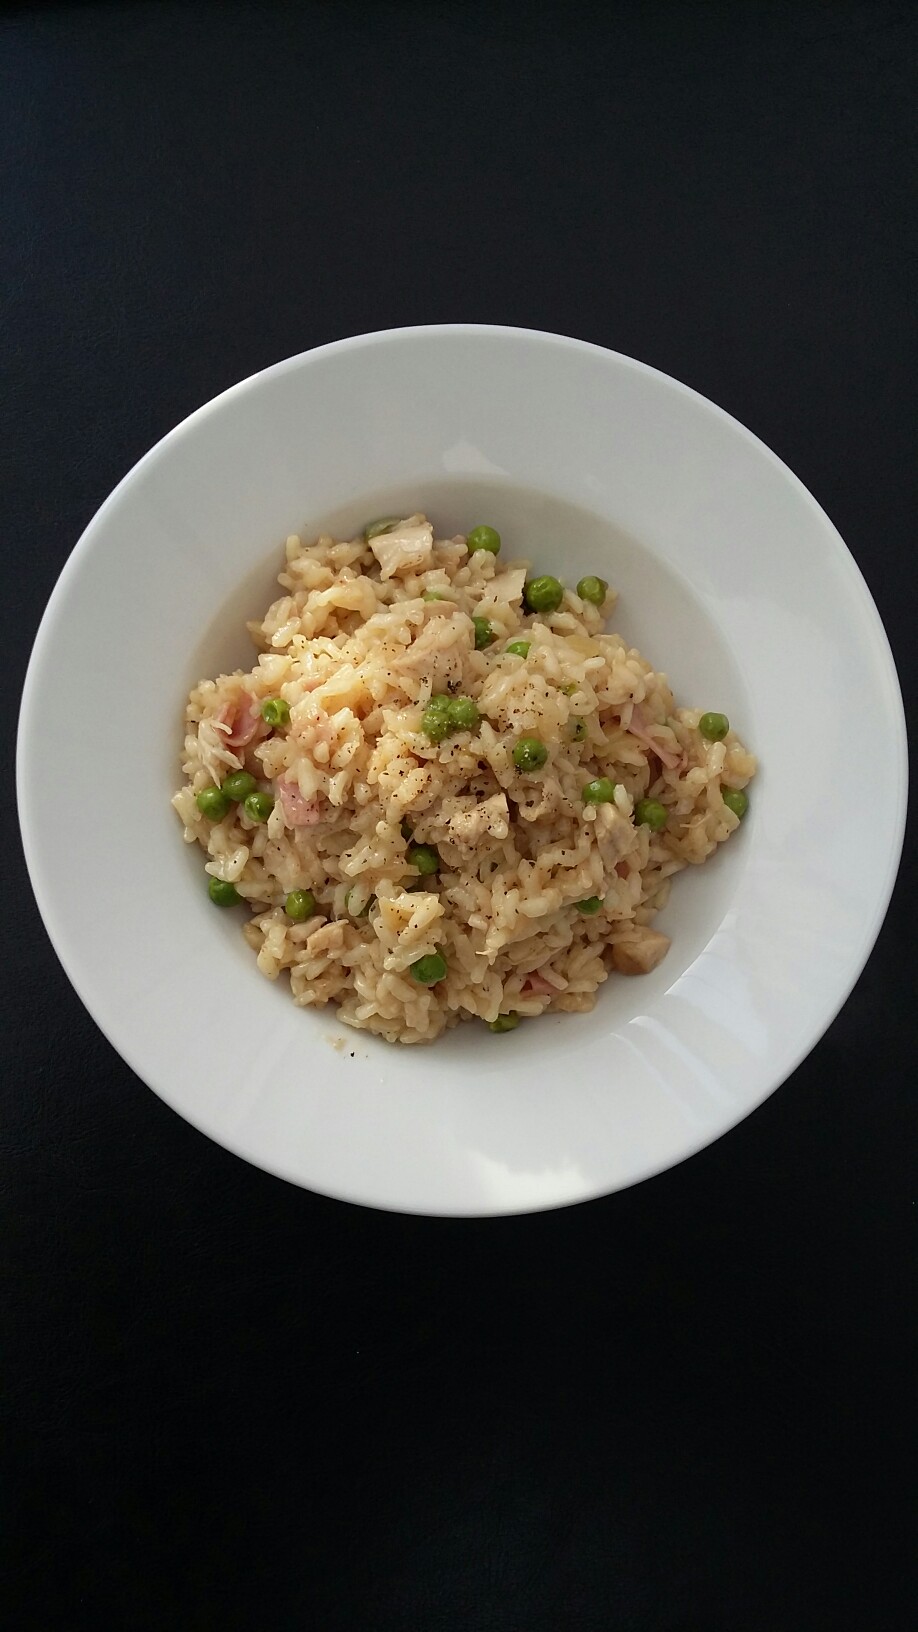
Chicken and Parmesan risotto

3 chicken thighs (cooked)

250g arborio rice

125ml white wine

4 slices smoked ham (cut into strips)

A couple of handfuls frozen peas

1 onion (finely chopped)

Grated parmesan

Chicken stock

Extra virgin olive oil 

Butter

Sea salt

Black pepper

The ingredients listed here do not all contain measures because the risotto can be altered to suit tastes. For example, I love black pepper and always add more than some people would like.

Start by removing all of the meat from the cooked chicken thighs and cutting it into smaller pieces for the risotto. I tend to discard the skin.  Set the chicken aside.

Heat a couple of tablespoons of the olive oil in a frying pan and add the rice. Stir until coated with the oil and cook on a low heat.  Add a little butter. When the rice is opaque, add the onion and stir well again. Add the wine and cook for two minutes.  As the onion softens, pour in some of the stock and stir.

Continue to add stock as it is absorbed. Don’t let the rice burn. Stir gently and add the frozen peas and the ham.

Keep the heat low and add the chicken pieces and some seasoning.

Taste the rice every now and again to see if it is cooked through. Add more seasoning and butter if necessary. When the rice is soft, take it off the heat and stir in the grated Parmesan. Beautiful!


Molten lava burgers.

It was only a matter of time before I posted a proper burger recipe and this is it.  Slow Food is important for a number of reasons, not least because you should end up with a tasty end product that knocks shop-bought items out of the park.  However, I’ve cooked plenty of things from scratch and wished I’d gone to the shops instead.  My burgers, for example, haven’t always been worth the time and effort I put in.   I’m happy to say that I’ve finally made a delicious burger that is going to revolutionise my summer eating!

Forget fast food joints and shiny posters of burgers that don’t represent what you’re actually sold.  Grab some quality ingredients and spend a few minutes making these meaty marvels.  Not only are they really easy to make, they’re very tasty and easy to adapt to your own tastes.  Life’s too short to eat grey patties between sugary bread.  Give dehydrated onions and wilting lettuce a miss.  Instead, go for fresh and fun molten lava burgers!  Hmmm…that sounds like it should be on a poster.

Molten lava burgers

375g minced beef

1 red chilli (finely chopped)

1 onion (finely chopped)

4 tblspoons fresh chives (finely chopped)

45g butter (melted)

2 tblspoons tomato ketchup

1 tspoon smoked paprika

1 tspoon Dijon mustard

half tspoon ground cumin

Cheddar cheese

salt and pepper

I made three large patties, but you could make smaller ones.

I began by putting all of the ingredients except the chilli and the cheese into a medium-sized bowl and mixing it up with a wooden spatula.  Season the mixture with plenty of salt and pepper.  I didn’t work the mixture too much because I didn’t want a tough texture for the burger.

I cut some thick slices of cheddar ready to go into the middle of the patties.  I then took some of the beef and made a large round patty.  I gently pressed the cheese onto the beef leaving a little room around the edges.  I sprinkled lots of the chopped chilli onto the cheese.  Next, I took some more beef and pressed it onto the patty making sure to completely cover the cheese.  I also checked that there were no holes for the cheese to ooze out of during cooking.

Now lots of recipes will recommend searing the burgers in a hot pan and then transferring to the oven to finish.  I didn’t do that, but I got wonderful results.  I fried the patties in butter on a low heat until nice and brown before turning them over.  I basted the patties with butter from the frying pan every now and again to keep them full of flavour.

The slow cooking meant that the meat cooked all the way through and just needed a few minutes in a hot oven at the end to bring it up to 71 degrees.

The biggest tip I can give you is to leave the patties alone while they cook.  Don’t prod them, don’t flip them, don’t lift them every minute for a peak at the underside.  Just let those bad boys cook.  Check them only occasionally to make sure that they aren’t burning.  If you keep bothering them, they’ll begin to crumble, you’ll have bits of burned onion in your pan and there will be smoke everywhere and cheese pouring out of the sides.  Let sleeping burgers lie.

Towards the end of frying, I tilted the pan to gather the butter in a little pool and slid the patties into it.  This helped cook the sides of the patties because they were quite thick.  You may not need to do this.  It just depends on the size of your patty.

I usually pile my burgers high with all kinds of silliness, but not this time.  The burgers were so tasty that I simply housed them in a toasted cheese-topped bap and served them with salad.  The chilli cheese was a real treat, but the flavour of the burger itself was the best thing.  You can’t beat slow food.

Deeply spiced, deeply missed.

I’ve spent all day wishing that I was back in bed.  I’m not well and all I’ve thought about at work is being snug in my cosy bed.  Arriving home, my wife told me to go straight to bed and get some rest.  Now I don’t want to go to bed.  It’s too early.  There’s only one thing that I want and I can’t have it, so I want it more than anything else!

Chilli con carne.  No wait, come back!  I’m not talking about any old chilli con carne.  I’m not talking about the minced-up slop that gets dolloped onto baked potatoes, or the stuff that comes in tins and might as well be dog food.  What my ailing physical shell is crying out for is some deeply spiced, meaty chilli with plenty of satisfying mouthfuls of flavour and comfort.  What I want is my beloved chunky chilli con carne, and sadly, there’s no chance of me having that wish fulfilled.

I made the chilli last week and thoroughly enjoyed it because I don’t make it often.  There are some things that I can make quickly, but chilli con carne is not one of them.  I really take my time, slow things right down to snail pace.  We’re talking seriously slow food.

The night before I make it, I cover the beef in spices and garlic and put it in the fridge.  The next day, I pile up the flavour and give the chilli lots of depth and a long, slow cook.  By the time it’s ready to eat, the meat is tender, full of flavour and so good that it can be served alone.  As it is, my preference is to pair it with some beautifully buttery mashed potato.  This is by no means a traditional partner to chilli con carne, but it’s something I remember from my childhood and it’s such a perfect way to make sure that every last drop of chilli is mopped up.  The chilli and mash combo is so comforting and hearty that it’s no wonder my immune system is calling out for it.  A shame then, that all I have is the memory of last week and a recipe for my ultimate chilli con carne that may just knock your socks off.

My ultimate chunky chilli con carne

400g stewing beef (roughly chopped)

1 tin chopped tomatoes (400g)

1 tin red kidney bins (400g)

1 red onion (sliced)

1 Spanish onion (sliced)

3 cloves garlic

4 tblspoons dried oregano

2 tblspoons chilli flakes

2 chipotle chillis

1 red chilli (sliced)

2 tblspoons coriander seeds

2 tblspoons cumin seeds

2 tblspoons cumin powder

1 bunch fresh coriander

1 tblspoon tomato puree

1 tspoon cinnamon

olive oil

sea salt

Put the beef into a plastic container ready to go into the fridge.  Add the cinnamon, two tablespoons of oregano, two tablespoons of dried chilli flakes, two roughly chopped garlic cloves and a teaspoon of cumin powder.  Mix thoroughly and then seal the container.  Leave in the fridge overnight if possible.  A few hours will do if you don’t have the time.

The next day, let the meat come back to room temperature before cooking it.  Dry fry the cumin and coriander seeds in a hot pan, but don’t allow them to burn.  Toasting them will release their flavour.  Grind them to a powder and set aside.

Brown the beef in a couple of tablespoons of olive oil and then add both of the onions.  Tip the ground coriander and cumin seeds into the pot, add another clove of garlic and stir.  Allow the onions to soften and cook through without burning.  Add another couple of tablespoons of oregano and the red chilli.

Next tip the tomatoes in and stir.  Allow to cook for five or six minutes and then stir in the kidney beans and the tomato puree.  Add another teaspoon of cumin powder.  Finally, pour in just enough water to cover the beef and add the chipotles.  Make sure that everything is well mixed together.  Cover and cook on a low heat for an hour or so, stirring every now and again so that nothing sticks or burns.

The beef needs to cook slowly and become soft.  Once it is tender, take the lid off the pan and cook the chilli for another hour to allow the sauce to reduce and thicken.  If you’re into coriander like I am, chop a bunch and stir it into the chilli just before serving.  Don’t forget to remove the chipotles before tucking in.

The slower, the better.

Our best intentions are challenged daily and we often find ourselves making choices we thought we wouldn’t.  This applies to food too.  When I’m tired, grumpy, or both, what sort of food do I crave?  What sort of meals do I end up preparing?  Certainly not the kind that will benefit my family or my heart.  That’s why planning meals is useful.  Shopping for specific ingredients rather than random items that may or may not make a meal or two is definitely wisest.  Even so, there are times when unplanned meals come together with the ingredients in the fridge.  That’s what happened today and the results were tasty, filling and chalked up some brownie points with my wife.  She loves it when we, “use things up”, although, if we shopped smarter, we wouldn’t need to do so!  The temptation to resort to frozen pizzas or take away is not always easy to resist when you’re exhausted.  That’s one of the battles being fought by food lovers the world over, particularly the Slow Food movement.  Today, quality food prevailed.  I wanted to sit down and eat some cake, but you’ll be glad to hear that I chose instead to fight the good fight.

I decided to make an omelette with lots of my favourite things in it.  This is a fantastic opportunity to use up various bits and bobs.  It was also a good way of getting a variety of healthy ingredients into my body without resorting to making a salad.  Nice as they can be, I’m just not a salad fan, and listening to the rain hit the windows didn’t inspire any urges for a leafy dinner.  The variations on this recipe are too numerous to list, but I definitely would have use more herbs from the garden (thyme, Greek oregano, parsley, mint, marjoram) if the rain hadn’t been bouncing off the ground.  Use what’s in and try to keep it colourful.

Mediterranean Omelette

3 or 4 large eggs

2 ripe tomatoes (sliced)

1 courgette (diced)

1 red onion (sliced)

1 onion (sliced)

2 garlic cloves (sliced)

1 handful Kalamata olives (pitted & halved)

2 tblspoons fresh basil (sliced)

1 tblspoon dried oregano

olive oil

sea salt

pepper

Use a high heat to stop the courgette becoming soggy.

Heat some oil in a frying pan or wok and fry the courgette on a high heat.  Courgettes have a high water content and low temperatures will simply allow the courgette to release that water and go soggy.  Once it begins to brown, take it off the heat and set it aside in a bowl.  Next gently fry the onion and garlic until soft and just cooked.  Don’t brown them.  Set these aside too.

Beat the eggs and season with salt, pepper and oregano.  Heat a large frying pan and add a little oil before pouring the eggs in.  Quickly add the courgette, tomatoes, basil, onion and garlic and Kalamata olives.

Do they need to be from Kalamata?  Nope.  A huge variety of olives are available.  Spanish olives are the most common, though these tend to be poor quality unless you’re willing to spend more.  Be careful.  Some companies are well aware of the desirability of Greek olives and package their Spanish produce cleverly, going as far as displaying a small Greek flag on their jars.  The easiest way to spot dodgy olives is by looking out for phrases like Greek-style olives.  Like all things, paying a little more will give you a completely different product that is worth your time.  Simple dishes rely on the quality of the ingredients.  Perhaps I’m a little too passionate about olives.  Let’s get back to the omelette.

The simpler the dish, the better the ingredients need to be.

Cook the omelette on a low heat so that it can cook through without needing to be turned over.  I’ve included red onion in the recipe for colour and because I like the fresh, sweet taste.  It doesn’t really need to be cooked.  The white onion and garlic would be overpowering if left uncooked, hence the quick fry.  Add the red onion last and grind some pepper over the omelette as it is cooking.  Once the egg has cooked through and is no longer runny on top, slide it onto a plate and season again if necessary.  I think this is a great summer meal that could be shared and eaten with salad (if you want to live your life like that).  A little drizzle of extra virgin olive oil helps it go down a treat!

Eating colourful food makes you feel good!