Caramel Tiramisu.

SAM_1455

If you’re of Italian descent, look away now.  I’m going to share a recipe for tiramisu, but not as you know it.

It would probably be fair to describe Italy’s cuisine as the most popular in the world.  Can the contribution of pizza really be surpassed?  I think not.  Perhaps most appealing is the versatility of Italian dishes.  The U.S has taken the basic concept of pizza and taken it to another level, though sometimes with questionable results and much to the horror of Italians, I’m sure.

Today, Italian flags are used to sell all kinds of food products in a bid to attract those with an eye (and a palate) for the authentic.  Italian food is predominantly marketed by relying heavily on tradition and the heritage of the food in question.  It seems that the public would much rather buy food with a long history and preferably a lineage that guarantees reliable production techniques and a family feel to the branding.

I can certainly identify with that preference.  Buying from a family-run company with history and heart makes for a much more satisfying purchase.  However, you can have too much of a good thing.

Bound into the long-standing traditions of many an Italian recipe, are conservative attitudes that can border on severe.  What is a traditional pizza?  When is a pizza not a pizza?  What is the definitive recipe for [insert popular Italian dish with highly disputed ingredients and/or cooking methods]?  At one time, questions like these would have mattered to me.  However, I’ve eaten enough to know that in the end, what matters most is the taste.

For some, twists, variations, innovations and improvements are unacceptable in certain recipes.  Much to the chagrin of any conservative Italian readers, I would like to share a recipe that would not perhaps qualify as a tiramisu in certain circles.  You can call my recipe whatever makes you happy.  I call it my Caramel Tiramisu and it’s about as good as a pudding gets.

SAM_1454

Caramel Tiramisu

250g mascarpone cheese

395g sweetened condensed milk

2 Daim bars

6 sponge fingers

4 shots of espresso

20ml caramel syrup

cocoa powder for dusting

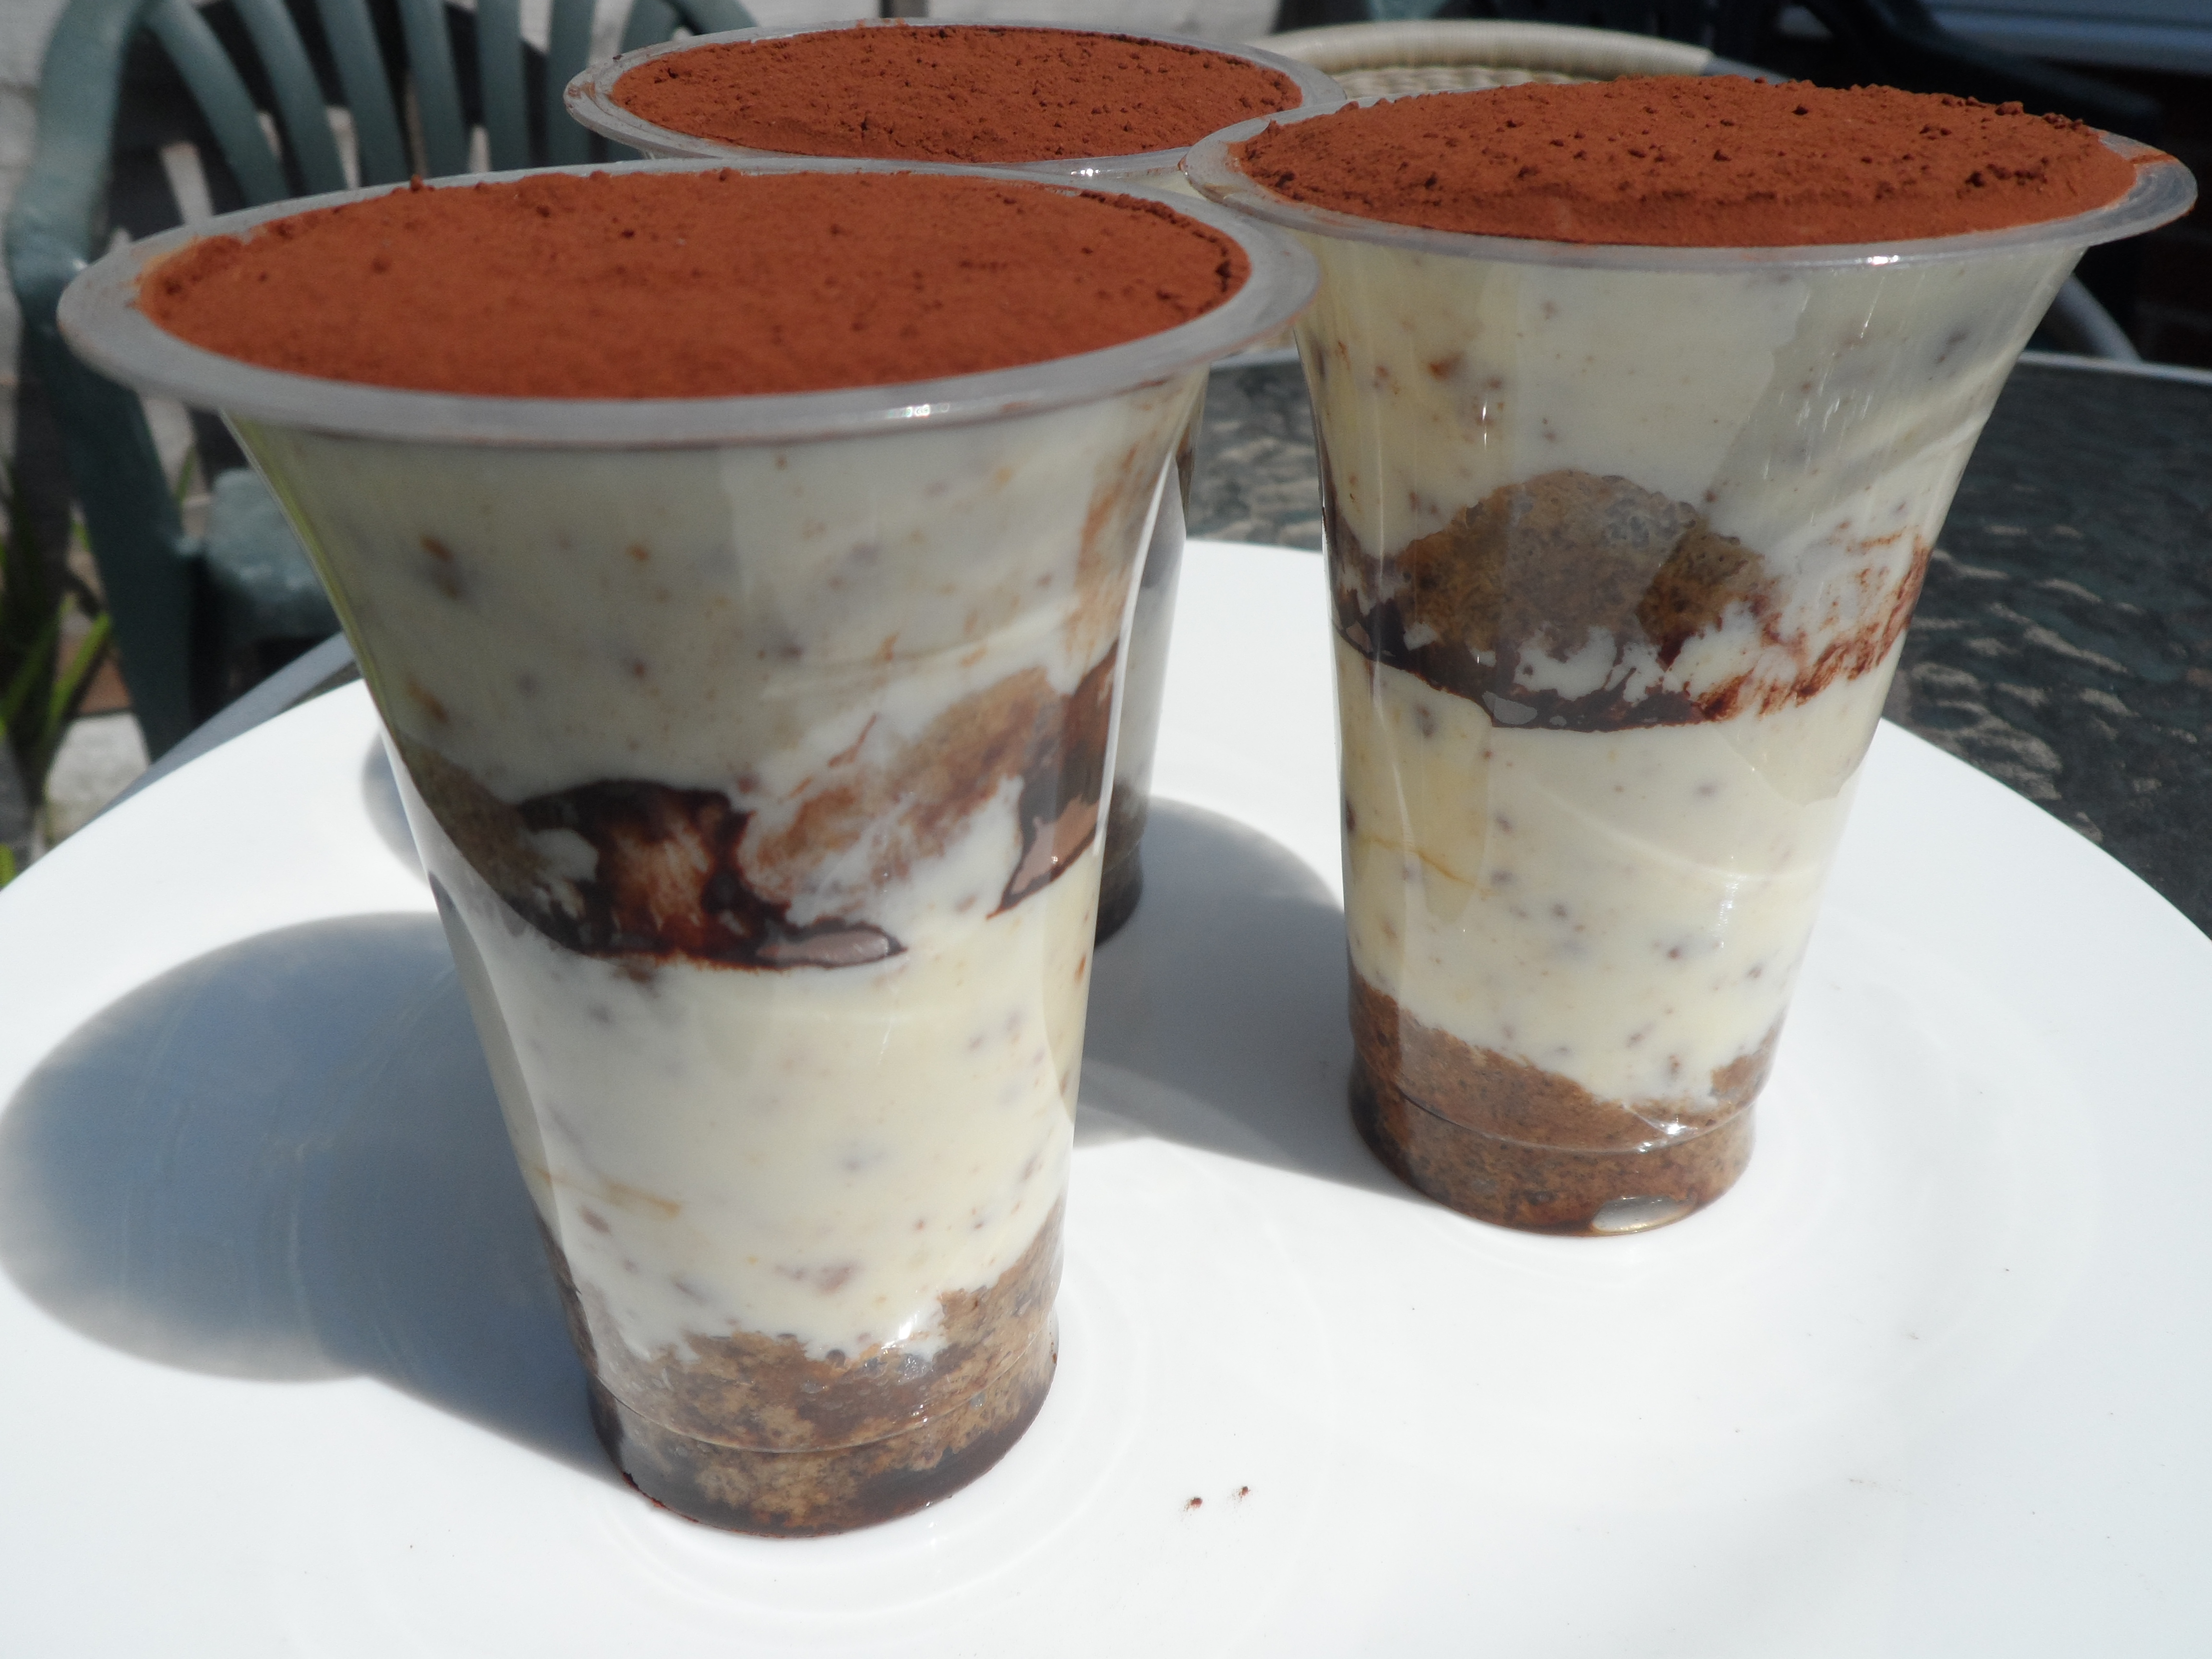
I made 3 individual pots using the quantities shown above.  Daim bars are widely available in the UK and parts of Europe, but may not be easy to find in America.  They are a buttery almond caramel coated in milk chocolate and they’re delicious!

SAM_1456

I used an electric mixer to blend the condensed milk and mascarpone cheese in a bowl.  I used a pestle and mortar to crush the Daim bars into a caramel rubble and then stirred them into the cheese mixture.

Next, I put the coffee in a shallow bowl, stirred in the caramel syrup and dipped the sponge fingers in.  If you let them soak up too much coffee, they’ll be very soggy.  I used two sponge fingers for each individual pot.  To begin with, I broke a sponge finger in half and pushed it into the base of the pot.  Then I added a big layer of the cheese mixture and gave it a good dusting with the cocoa powder.  I then put another layer of sponge finger on top and repeated with the cheese mixture and plenty of cocoa powder to finish.

The pots went into the fridge overnight.  You have a choice:  You can eat the tiramisu immediately and the Daim bar pieces will be crunchy OR you can do what I did.  Wait until the pots have been in the fridge overnight and then enjoy the caramel swirls created by the Daim bar pieces that have dissolved.  This creates a truly delicious treat!

A warning- this is an extremely sweet pudding.  If you prefer a lighter dessert, you may wish to double up the quantity of mascarpone.  Yes, that will increase your yield, but it will also make the result less rich.  It goes without saying that I would not dream of doing any such thing.

SAM_1449

Advertisement

Caramel monster cake.

The first Halloween at The Last Piece of Cake!  I’ve been determined to make something special for Halloween, but I promise to spare you the awful puns and themed vocabulary.

The marketing monsters have really cranked Halloween up in England and not a shop is without a splash of orange, a little purple or a cobweb in the window.  Yes, I think America would be proud of the influence it has had on Halloween festivities here.  Soon, however, the plastic spiders, the chattering skulls and glow-in-the-dark witch’s fingers will be packed away and quickly replaced with snowy scenes and glitter-covered dangly decorations.

Swiftly then, let’s get onto the good stuff!  As I’ve mentioned before, my mum is The Queen of Puddings.  It’s not an official title and to be fair, it’s likely that somewhere in the world, there is a genuine Queen of Puddings who would become rather flustered if she were to hear me bestowing the title on my mum in a food blog.  The fact is, my mum lives for everything that is sweet in this world and far from simply gorging on it, she also creates a fair amount of sugary awesomeness for her adoring family.

This week, mum made some very chocolatey brownies to welcome us back from a trip to London.  Yesterday, she visited with the rest of the brownies because there were too many for her to get through.  You can see how hard my life is, can’t you?

My childhood was one long list of amazing birthday cakes and scrumptious bakes as mum enjoyed being creative and serving up beautiful, warm, joy fresh from the oven.  Birthday cakes ranged from wonderfully iced squares with our name and age to WWF (as it was then) wrestling rings complete with sugar laces for ropes and marshmallows for turnbuckles.  Whatever me and my brother were into at that time, mum would find a way to make a cake from that theme.  She did it with so much love and it has always touched me that she used her creativity in such a wonderful way.  It’s something I’d like to do for my family and I’ve got a feeling that this caramel monster cake will be making an appearance beyond Halloween.

I’d spotted the red food colouring weeks ago during a re-shuffle in my ingredient cupboard.  I knew there and then that the cake I’d make for Halloween would be bright red, but I didn’t know what kind of cake it would be.  Where to start?  Well, red velvet cake is pretty simple to make, but doesn’t really taste of anything.  I wanted a cake that was tasty and not just a novelty because of how it was decorated.  My mum’s cakes always tasted fantastic, regardless of the theme.  Why make a cake that isn’t full of flavour?

For some reason, the internet is awash with recipes involving caramel and salt combinations recently.  No complaints from me, but I’m not sure where the trend has come from.  I love caramel and I thought it might be cool to cover the cake with caramel frosting.  Now that would be tasty!  Plenty of salt crystals would keep me happy and stop me from reaching for the peanut butter (which I think would be a brilliant base for some frosting).  I didn’t want a peanut flavour, I wanted pure caramel.  It was an experiment from start to finish, but I’m happy with this little monster.  Maybe I can scare away the trick-or-treaters with it!

Caramel monster cake

200g self-raising flour

200g butter (softened)

100g dark muscovado sugar

100g demerara sugar

4 eggs

2 tblspoons milk

1 tblspoon ground cinnamon

2 tspoons red food colouring

1 tspoon baking powder

(For the frosting)

1 tin (390g) sweetened condensed milk

100g demerara sugar

60g dark muscovado sugar

2 tblspoons butter

2 tspoons red food colouring

1 tspoon vanilla extract

The cake itself is similar to a basic sponge cake.  The method is certainly the same.  Begin with a bowl of the flour and baking powder and cinnamon.  Add the eggs, milk and sugar and beat until smooth with an electric hand mixer.  Add the food colouring.  You may need to add more to get a really good red.

Divide the mixture between two 20cm sandwich tins lined with baking paper.  Bake in the centre of the oven at 180C for about twenty-five minutes.  The middle should be springy and a skewer should come out clean when the cakes are done.  Cool them on a wire rack until ready to decorate.

To make the frosting, heat all of the ingredients in a small pan until the butter has melted and the sugar dissolved.  Stir constantly to avoid burning the pan.  Make sure the heat is not too high so as to prevent the sugar from burning.  I was careless and burned the bottom of the pan- what can I say?  I’m a genius.

Bring the caramel to the boil and cook for two minutes.  Take it off the heat and continue to stir as it cools.  At this point, I sprinkled lots of sea salt into the pan for extra texture and the lovely saltiness that complements caramel so well.  The caramel will begin to set so you need to start working with it while it is still warm, but not too hot.  I frosted between the two cakes to make a sandwich and then coated the entire cake once assembled.  All that was left to do was to add the mouth and eyes.  I used mini marshmallows for the teeth and found some Halloween jelly sweets for the eyes.  A final sprinkle of sea salt, and the caramel monster cake was complete.